This write up is for a 2000-01 VI manifold swap on to 95-99 maxima. There are many ways to do this swap so first I will number the ways I know how to do this and then go into detail on how to do it. There are a couple of different Upper manifolds you can get Fed spec. or Cali Spec the difference is one may not have the swirl valve control (don’t need it anyway). I believe (don’t quote me on this is) that the 00 Fed Spec do not have the swirl valve control and all 01 (Fed and Cali) do not have the hole for the EGR guide tube. You may want to ask the People from the Junk yard this because you want to know this if you are going to keep the EGR or not.
(note when I say 00 that means both 2000-2001 unless I specifically say otherwise for that part)
1) 00 Upper and Lower (Fed spec), 00 Fuel rail & injectors or 01 QX4 fuel rail & injectors (they are the same because I am using the QX4 fuel rail and inj.), 00 Throttle Body w/ 00 IACV, 00 EGR guide tube. (no adaptors needed for this)
2) 00 Upper and Lower (Fed or Cali), 00 Fuel R&Inj. Or 01 QX4 Fuel R&Inj, 00 TB w/ 00 IACV, and running no EGR.(Make a plate to cover the hole in the manifold)
3) 00 Upper and Lower, 00 Fuel R&Inj or 01 QX4 Fuel R&Inj, 00 TB w 4th gen IACV (need a adaptor plate made for the 4th gen IACV), and 00 EGR guide tube or no EGR (need to make a plate to cover the hole)
4) 00 Upper and Lower, 00 Fuel R&Inj or 01 QX4 Fuel R&Inj, Pathfinder TB (need a adaptor plate made) 4th gen IACV (need a adaptor plate made), and 00 EGR guide tube or no EGR (need to make a plate to cover the hole).
5) 00 Upper and Lower, 00 Fuel R&Inj or 01 QX4 Fuel R&Inj, 4th gen TB (need a adaptor plate made) 4th gen IACV (need a adaptor plate made), and 00 EGR guide tube or no EGR (need to make a plate to cover the hole).
6) 00 Upper and 4th gen Lower, 4th gen Fuel R&Inj, 00 TB w/ 00 IACV, and 00 EGR guide Tube or no EGR (need to make a plate to cover the hole).
7) 00 Upper and 4th gen lower, 4th gen Fuel R&Inj, 4th gen TB, 4th gen IACV, 00 EGR guide tube or no EGR.
8)0 8)0 00 Upper and 4th gen lower, 4th gen Fuel R&Inj, Pathfinder TB, 4th gen IACV, 00 EGR guide tube or no EGR (need to make a plate to cover the hole).
I think those are all the different ways that u can do the swap parts wise. In addition to those parts listed above you need to get:
- a lot of new hoses (different sizes), some fittings and TEE’s.
- hose clamps
- new gaskets for the 00 lower, the upper should not need new gaskets since they are rubber (unless they are torn)
-Bolts for the upper manifold (8 of them) unless it came with it, should be able to reuse the lower manifold's bolts.
-New bolts for the VIAS back cover (metal cover) and the vaccum switch (just a suggestion because you might have to take it off later and the OEM screws strip easy).
-Bolts for the 00 TB, if your going with the 4th gen or Pathy TB you will have to find out from the person you get the adaptor plates from what bolts are needed.
-Adaptor Plates for 4th gen TB, 4th gen IACV, or Pathy TB
-Cover Plates for EGR or 00 IACV (explain later)
- JB weld the liquid type and JB weld Stick
-New different PCV w/hoses
Tools: Dremel or grinder
- socket set (deep as well as regular) you will mainly use 14mm, 12mm, 11mm, 10mm so get those in deep socket.
- Flat head, and Phillips head screw drivers
I will post more when I get the pics and write out how to do it.
PIC 1
PIC 2

PIC 3

PIC 4

-Prep. work, before you start installing you want to do a couple of things:
-If you are using the 5th gen lower and it has the swirl valve, remove everything so it’s just like the 4th gen (See PIC 4) Once it’s removed use some the JB Weld Stick to cover the holes so there will be no leaks. I just plugged the two outside holes (see pic the holes are highlighted in red.)
-Also you want to either fix or just prevent the VIAS from breaking by using the regular liquid JB Weld heres a link that explains what to do http://www.cardomain.com/ride/763858/5 . If you want to you can replace the bolts that hold the VIAS solenoid and the metal plate on the there side in place (see pic). I had to because one of the screws stripped on me so I went to Home Depot & bought a kit that removes stripped bolts or screws.
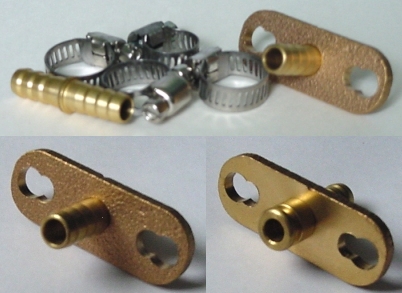
-Fuel rail depending if you went with the 2000 Maxima fuel rail you will have to buy something like that (see pic 1 & 2 ), and if you used The 01 QX4 fuel rail you can do what I did (see pic 3). I took off the piece you see in the pic and used a grinder to cut off the extra metal tube and bent it in to place so it would reach the fuel line hose. It did not line up exactly with the hole so I just screwed in one side of the fitting and have no problems with it. I made it just like the 4th gen fuel set up wise (like the place of the FPR).
- First go to the fuse box located on the dash of you car and remove the fuel pump fuse. Then you want to start your car and let it run until it dies, do this process until you can’t start you car at all. This will remove most of the fuel out of your fuel rail and injectors.
- Next up remove your intake (note: I would label all of you hose either by marking it with something or with numbered stickers, and right it down in a note book what it means).
- On the Throttle body disconnect the plugs from the TBS and the cables. Now get a towel or a container so you can catch the antifreeze when you remove the hoses on the bottom of the Throttle body. Once you have everything disconnected from the TB remove the (12mm) bolts in the throttle body.
- Start disconnecting all three coil packs, IACV plugs, and other wires to clear up space when removing the upper manifold.
- After you have the TB off start removing all hoses and components that are on the upper intake manifold and labeling them. When you have everything off the upper manifold, begin removing the bolts in the front of the upper manifold (note: there are 2 bolts on the back of the upper manifold that you will have to remove). Remove the ERG guide as well.
- For those that are using 4th gen fuel rail and 4th gen lower manifold skip to preparing engine for upper manifold. If you using the 5th gen parts read on
- Once the upper manifold is remove began removing the fuel rail, I remove the fuel hoses first (I placed a towel around the hose from the fuel filter to the fuel rail so gas would not spill onto the engine). Then remove the bolts for both the fuel rail and lower manifold.
- Once you have removed the lower 4th gen manifold you can now place the 5th gen lower manifold and bolt it up.
- Then you can put then new fuel rail on the lower (if you are using the 2001 QX4 one or to of the holes will not line up, like mines, but it will still be good). The next thing you don’t have to do I just did: you’ll need the rubber washers that came of your old fuel injectors place them around each of your new injectors. I did this because there was a gap from the lower manifold to the fuel injectors. After you bolt the fuel rail down it’s time to cut the old 4th gen fuel injector connectors off and solder them (or connect them anyway you want to) to the 5th gen connectors. Most people don’t like cutting wires but it’s not hard. Also you need to ground the fuel rail (I bolted them down onto the lower manifold because it was the easiest location for me.) Now get some of the new hoses that you should have purchased and connect them from the fuel filter to fuel rail and fuel rail to fuel filter.
Prepareing the engine for the upper manifold
- Now that the lower manifold and fuel rail are on, cover up the holes in the lower manifold so nothing can get inside. Remove the PCV out of your valve cover because it will not let the upper manifold sit properly on the lower manifold (later I will tell you what I did for this).

- For the next part you will need you grinder or dremel. You will need to grind down the coil pack mounting bosses BUT ONLY THE FRONT MOUNTING BOSSES#3 AND #5( SEE PIC ABOVE). #3 and #5 are the ones to the right of you if you are standing in-front of the car looking at the engine. Grind down as much as you need to just keep putting the upper manifold on to check for clearance. Once you are done clean up the mess you made grinding down the bosses.
- Next up is the PCV, you should have bought a new PCV valve one that would allow you to connect to some hoses. The hose’s outside diameter should be ½ inch for it to fit in the valve case hole tight and cut it to be about 6-8 inches long. You might have to lubricate the hose for it to slide in (at least that’s what my girl keeps telling me j/k lol).
- Note this is only for people that are keeping the EGR and 5th gen IACV: